A very simple introduction to JavaScript modules
Last updated: September 27, 2022.
JavaScript has come a long way since its humble beginnings as a primitive scripting language designed to add a little functionality to web pages here and there.
A major milestone in its journey was the ES6 (2015) update to the JavaScript language, which introduced a whole host of new and useful feature.
One of the most important of these updates was the introduction of modules, which enable us pass data and functionality from one JavaScript file to another.
What are modules?
Don’t let the terminology throw you off! A module is nothing new. In fact, a module is just another term for a JavaScript file.
What’s so special about them, then?
Of course, Javascript files are nothing new. But before the introduction of the modules syntax we were effectively Before the introduction of modules, we were effectively restricted to working in a single module (i.e. a single .js file).
The ES6 modules syntax changes this, enabling us to create multiple .js files that pass data and functionality to each other by using the keywords import and export.
So we can now spread our JavaScript code across multiple files.
A basic example
Let’s say we want to section off some useful functionality to another module and then import it into our main .js file.
For example, the Math object does not allow us to calculate the sum total of a numeric array. So it might be useful to make the functionality available to us through the importation of a separate module containing the functionality.
To do this, I save the following code to a new .js file called usefulFunctions.js:
function sum(arr) {
    return arr.reduce(function (a, b) {
       return a + b;
    }, 0);
 }

 export { sum }
For now, this is still a self-contained file.
Exporting
To export the function, we need to use the export keyword. And inside the following curly braces, we enter the name of the function. We add this at the end of the file.
function sum(arr) {
    return arr.reduce(function (a, b) {
       return a + b;
    }, 0);
 }

 export { sum }
This makes it possible for another .js file to now import this functionality.
Importing
Now, in our main JavaScript file, which we will call index.js, we can import whatever functionality or data has been made available for export by another .js file.
Let’s import the sum functionality from usefulFunctions.js. For this, we use the import syntax at the start of index.js:
import { sum } from './helperFunctions'
Note here the lack of a .js extension for helpFunctions. Optionally this can be added, but the .js extension is assumed.
Now, the sum function is available for us to use anywhere in index.js:
import { sum } from './helperFunctions'

const result = sum([1,4,6,5]);

console.log(result); 16
So this is cool: we are now able to execute a function that is defined in another file.
In real projects, this is really useful because we can import functionality without cluttering our index.js file. We can also helicopter in helperFunction to another project and import the functionality there as well.
This brings us nicely to the topic of the advantages of modular programming.
Why use modules?
✅ Code organisation
Modules make JavaScript much easier to work with, especially when working on complex projects.
Rather than storing all of our code in one file, we can organise it into separate modules. This makes our index.js file much easier to work with and our overall codebase more manageable.
✅ Importing external functionality
In this example in the previous section, we defined a sum() function and stored it in a module called helperFunctions.js. We were therefore importing functionality from our own module.
But a powerful feature of modules is that we can import modules created by others and call on that functionality in our own code. This literally opens a whole world of possibilities.
✅ Reusability
With modules, we can easily make use of the same functionality from one project to the next. All we have to do is copy the relevant modules and import them in a new index.js file and we’re ready to go.
Without modules, we would have to search within our index.js file for the functions we would like to carry over from one project to the next.
Compatibility issues
Modules are great to work with. But there is a big gotcha: compared to static, single-script code, modular JavaScript can run into compatibility issues with some browsers.
Though most browsers support modules and it is possible to find workarounds, a more robust solution is to compile JavaScript modules to a single, easily readable file using Webpack and Babel.
Below we show you how you can convert JavaScript modules into a single browser-friendly file using these technologies.
Setup: Webpack + Babel
Using Webpack and Babel, we can turn modular JavaScript into a single file that will be understood by all browsers.
In the process:
- Webpack acts as the module ‘bundler’, creating a single JS file
- Babel compiles our code to older, more cross-browser friendly syntax
By using these technologies, we can can ensure cross-browser compatibility.
# Step 1: Install Node.js
First, we need to make sure that we have Node.js installed. We need to do this to gain access to the NPM package manager and installed (through which we will download and install Webpack and Babel).
We can do so from the command line with node -v:

If Node.js is installed, running this code will return the version.
If no installation is found, vist the Node.js website and download the latest stable version. Then try running this code again to confirm it has been successfully installed.
# Step 2: Install Webpack and Babel
Once Node.js is installed, we need to run the following code in from the command line in the root directory of our project:
npm init
You will be prompted to enter some information about the new project (as this is only a tutorial, it is okay to skip these steps). Once all information is entered and the process in complete, a new package.json file will be available in the root directory of your project.
We are now ready to install Webpack and Babel packages from the command line using the following npm code:
npm install --save-dev babel-core@6.26.3 babel-loader@7.1.5 babel-preset-env@1.7.0 webpack@3.8.1
Make sure to specify the version numbers as above. Otherwise your code may not run as expected.
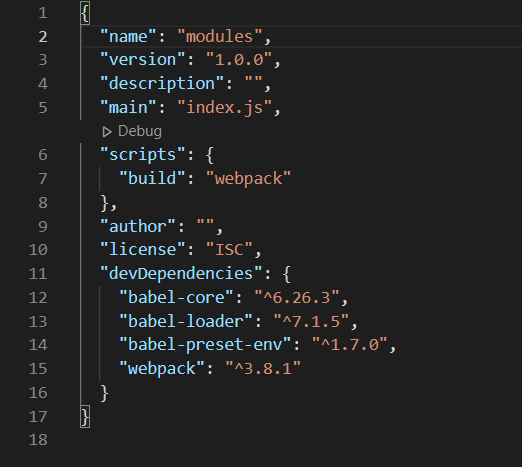
After the installations are complete, check to see if they were installed correctly by opening package.json. A reference to each of the installed modules should be nested within “devDependencies”.
If there was an error in the installation, try to resolve the error messages provided by npm in the command line terminal.
# Step 3: Configure Webpack with Babel
We now need to provide Webpack with information about:
- Where it can find our main JavaScript file (index.js)
- Our desired output destination for the compiled, single .js file and filename
- That we want to run Babel when compiling to make the syntax browser-friendly
We do this by creating a file called webpack.config.js in the root project folder.
For this tutorial we use the following basic configuration:
const path = require('path');

module.exports = {
    entry: {
        app: './index.js'     // Location of main.js file
    },
    output: {
        path: path.resolve(__dirname, 'build'),  // Output directory
        filename: 'bundle.js'     // Filename for output file
    },
    module: {
        loaders: [{
            test: /\.js?$/,
            exclude: /node_modules/,
            loader: 'babel-loader', // runs Babel
            query: {
                presets: ['env']  // Popular preset for browser-friendly JS output
            }

        }]
    }
}
Step #4: Run Webpack
To run Webpack, let’s return to package.json.
Here, add "build": "webpack" to scripts. This means that if we run npm run build from the command line in the root folder our our project, it will run Webpack, compiling our files.
So now we can run Webpack from the command line with:
npm run build
Unless you are compiling a very large modular project, this should takes a few seconds or less.
Once finished, a single, cross-browser compatible .js file – effectively containing within it the modular functionality you have programmed – will be available with under the filename and directory specified in webpack.config.js (in this example build/bundle.js).
Step #5: Link to bundle.js from index.html
We can now run bundle.js in the browser.
To do so, include a script tag linking to bundle.js in a html file.
Now, open your browser, and enjoy seeing your modules project run from a single .js file 🎉


