Accessing the DOM with Javascript
Last updated: October 7, 2021.
The DOM (the ‘Document Object Model’) is the tree-like structure of a web page, with elements nested within one another to create a tree-like appearance.
Though this may sound a little scary and abstract at first, the DOM is simply the collection of HTML elements that are the basis of any web page.
Javascript helps us ‘reach into’ the DOM to change these elements. And, as a result, change the apperance of web pages! Thus, Javascript is a very powerful tool to create interactive online experiences.
A Javascript file has access to the DOM once a HTML document links to it using the <script></script> tags. The DOM is then automatically available to use in Javascript through the document object. For example, the following code would link a HTML document to a Javascript file called script.js in the same directory.
We can see this by writing console.log(document) in the corresponding script.js file. When we load the HTML document, the linked Javascript file will now print the document object it has access to in the browser console. Viewing the console log, you can now see the DOM that Javascript can manipulate!
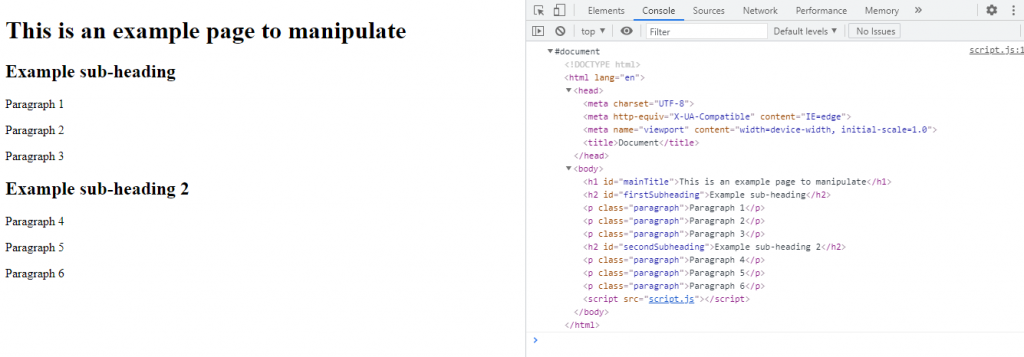
When we change anything accessed through the document object, we are also changing the DOM itself. This is the process through which Javascript can manipulate a web page.
The individual elements in the document object, however, are not automatically available to us. We have to append methods to the document object to reach them.
Knowing the right methods to apply to the document object in order to select the elements you want to manipulate is therefore crucial to use Javascript effectively
Below we cover the most common and important of these methods.
These can be categorised into three .getElement methods as well as a highly flexible query selector that enables the selection of multiple elements of varying type.
The .getElement methods
Selecting an individual element by ID
The best way to accurately access a single element is by its unique ID. We can do this easily by applying the .getElementById() method to the document object, i.e. document.getElementById(). Within the parentheses, we include the ID of the element we wish to select inside quotation marks.
For example, below we select the main title of the HTML document by its ID and save it to the variable selected. We then use Javascript to change the color of the main title to red:
Success!
Note that this method only works when an element has a unique ID. And its limitation is that it can only select a single element. What if you want to select a group of element?
Select elements by class
To access more than one element at a time, we can use the .getElementsByClassName() method. This is perfect for selecting a group of elements that have already been defined as belonging to the same class using the HTML class attribute.
For example, in the below HTML document, all six paragraphs belong to the paragraph class. We can select all of them in one line of code by their class name. We do so by entering the class name in quotation marks inside the parentheses of the .getElementsByClassName() method. Again, we save the result to a variable named selected.
Since we select multiple elements using this method, we need a method to select the individual elements we wish to modify. We can do so using the square bracket notation and the position of an element within the result, which is an array of elements:
selected[0] and the final element selected[5].
Getting elements by tag name
Another method in our toolkit is .getElementsByTagName(). This will select all elements with the same HTML tag.
For example, let’s select all <h2> elements from our ongoing example.
We can do so by entering the name of the HTML tag we wish to select on in quotation marks within the .getElementsByTagName() parentheses. Again, we can access individual elements within the returned array of elements with square brackets notation:
This is especially useful, for example, in selecting all elements of a certain tag and applying a new CSS style to them.
Added flexibility using query selector
The query selector is a special method that gives us more flexibility when accessing elements. The basic syntax is:
.querySelector()
.querySelectorAll()
As the method names imply, .querySelector() is used to access a single element and .querySelectorAll() for multiple elements.
We can select elements by ID, class or tag using query selector using syntax similar to CSS.
- To select by ID, we prepend
#followed by the ID of the element. For example:
.querySelector('#mainTitle') - To select by class, we prepend
.followed by the class name:
.querySelector('.paragraph') - To select by tag, we simply write the tag name:
.querySelector('h2')
This may seem like reinventing the wheel, but with the query selector comes an additional and powerful trick.
Namely, when using .querySelectorAll(), a comma placed between elements to select acts as an AND operator. This is great because it means we can select elements using different methods at the same time!
For example, let’s select our main title by its mainTitle ID and paragraphs by their tag name p:
This is not possible in a single selection using the .getElement syntax. Such functionality makes the query selector a powerful and flexible tool.
Conclusion
Accessing the DOM is a prerequisite for DOM manipulation in Javascript. Some developers prefer to use the .getElement methods in most cases and the query selector for complex selections; others use the query selector in all scenarios.
Whatever you prefer, the most important point is that you are able to select the elements you want to for a given task. It is also useful to have familiarity with all selector methods as you are likely to encounter these in others’ code.


